Writing an Ostinato

An ostinato is a repetitive musical figure that serves as an accompaniment and also adds a driving rhythmic quality to the music. In many ways an ostinato is not too different from a melody. It still relies on chord tones for support. The main distinction is that an ostinato is shorter and more repetitive than a melody.

Here is an example of a simple ostinato in the bass clef part:

Notice how this part repeats the same two note pattern over and over. This is the essence of an ostinato.

Here is an example of a more complex ostinato:

Even though this pattern is more complex, it still has the same repetitious quality. Also note that when the harmony changes in bar 3, the notes of the ostinato move to accommodate. The rhythm and the contour remain the same, even though the notes move slightly to fit the harmony.

To write an ostinato, follow the same steps as writing a melody, except limit the duration to one bar or less. You can do this by using faster notes, such as 8ths or 16ths, using shorter forms with only one or two blocks, and keeping the blocks shorter in duration.

Let’s follow the steps involved in writing an ostinato from scratch. Initially we will write a very short pattern. Then we will see how longer patterns can be created. First, lets use the shortest form of all which is simply “A”.

Next we need to choose a rhythmic pattern. We will select a very short pattern with only two boxes.

Now we need a contour. The contour must have the same number of events as the rhythm, namely two:

If we choose the duration of each box to be worth an 8th note, the resulting chord outline would be something like this:


If we play this pattern over a C major chord in the bass clef, it would look something like this:
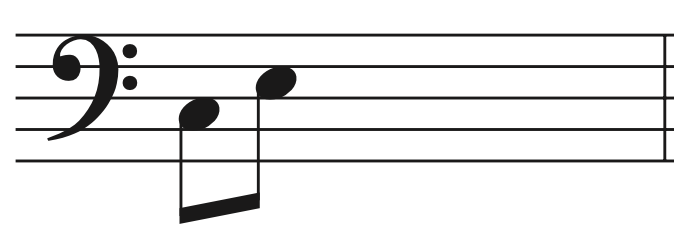

Similar to writing a melody, the next step is to add ornamentation. For the sake of this example, we will add a passing tone between C and E.

Now we simply repeat the figure:


If the chord changes, the chord tones of the ostinato, namely C and E, move to accommodate. The scale tones follow the chord tones:


This time we will write a slightly more complex ostinato. This one will use the form “A B”.

We select two rhythms, again using only two cells per rhythm:

Then we select contours which match those rhythms in terms of number of events:

If we were to write out our melodic outline over C major, this time in treble clef, it would look like this:

As usual the next step is to add ornamentation. We will add a lower neighbor to the first note and leave the other two notes alone. You can also choose other ornamentation options if you desire.

Now we repeat the ostinato:

If the harmony changes, the chord tones move to match the new harmony and the scale tones follow. Here we have placed the ostinato in the treble clef and the chords in the bass to show that ostinatos can be played in a high register as well.

Why Do We Use 12 Notes in Our Musical System?

The origins of our musical system began with Pythagoras around 500 BC. He created an instrument with a single string called a mono chord. He experimented by dividing it into segments and listening to the results. The first thing he noticed was that if you divide it into two segments you get a note which is higher but sounds equal in color to the first. This is what we call an octave. Then he noticed if you divide it into three segments you get another higher pitch which sounds slightly different in color to the first note. This is what we call a perfect fifth. In music notation this would be C G.

Once he determined that the perfect fifth was important he repeated the process 12 times using the perfect fifth interval. This produced pitches more or less equivalent to our modern circle of fifths. C G D A E B F# C# G# D# A# F C. However when he got back to the note C , it was not a perfect match but rather a little sharper than the original. This is known as the Pythagorean comma. Therefore in this system sharps and flats are slightly different in pitch.

Musicians and theorist tolerated this discrepancy for hundreds of years. In 1450 another system appeared called just tuning. This tried to use other fractions besides the perfect fifth to create purer sounding intervals.

Octave 2/1

Fifth 3/2

Fourth 4/3

Major 3rd 5/4

Minor third 6/5

Major 2nd 9/8, or 10/9

Etc…

The system also suffered from a similar disadvantage. Namely not all the intervals could be pure and coexist. For example, three Major thirds (an augmented triad) should take you back to the octave.

C E G# C

However, mathematically…

5/4 x 5/4 x 5/4 = 125/64 = 1.953

1.953 does not equal 2/1

In 1722 JS Bach published a book called the Well Tempered Clavier generally regarded as the most important book of music ever published. He proposed that rather than using pure mathematical ratios we should “temper” the ratios slightly to agree with one another. Pythagorean tuning yields an error of about 25 cents. He reasoned that if he took each perfect fifth and tuned it slightly flat by about two cents (remember he was doing this by ear, not a computer) after he completed the circle of twelve fifths he would get back to a more or less pure octave.

12 x .02 = .24 which is close to .25

To prove his point he composed 48 pieces of music in each of the 12 major and minor keys. This would be impossible or at least sound very poor in Pythagorean or Just Tuning.

This is the musical system we use today known as equal temperament. That is why we have 12 notes in our system and also how we derive the tuning.

Counterpoint

Counterpoint

Counterpoint is a style of writing that uses multiple independent melodic lines playing at the same time. It might seem that any music that has multiple parts is a type of counterpoint given this definition. However, the emphasis is on lines which are both independent and melodic, not just any lines.

What makes a line independent? The main features that define a melody are rhythm and contour. When two lines have different rhythms, i.e., happen at different times, and different contours, i.e., move in different directions, they are truly independent.

In example 1, both lines move in the same direction and have the same rhythm so they are not independent, even though they are playing different notes.

In example 2, the lines move in opposite directions but have the same rhythm. there independent in terms of contour but not independent in terms of rhythm.

In example 3, the lines move in the same direction but have different rhythms. They our independent rhythmically, but not in terms of direction.

In example 4, the lines move in opposite directions and have different rhythms. Therefore they are totally independent.

A question arises: When writing counterpoint do the lines need to be independent all the time? The answer is no. Independence means they are not tied to one another. They are free to differ, but it times they may also agree.

Although not mandatory contrary or oblique motion is always preferred over parallel motion.

How to Compose Music

How does one compose a piece of music?   While this question seems overly broad, there are some basic guidelines that can get you started down the path of learning how to compose music. In many ways composing music is not as difficult as you think it is.  In fact many great pieces of music have been written by people who lack a technical understanding of what they are doing.  Notes are free.  Anyone can choose them.

Chances are if you are reading this article you already have some musical experience.   That is not to say that you need to be an expert,  but rather  you have probably already had some musical encounters  if you are interested in learning to write music.

Let’s begin by tackling one basic question:  Is it easier to write melody first or harmony first?  Just to be clear melody is the singable part of the piece.  It is the signature or theme that makes peace recognizable.  Harmony on the other hand describes the chord structure of the piece.  It has nothing to do with the melody.  This may sound counterintuitive but in fact any melody could be paired with any harmony.  While the notes might have to change slightly here and there  is the rhythm and the contour (shape)  of the notes  which make a melody what it is.

When composing a piece of music  it is always easier to start with harmony.  I am sure that you love to sing in your car and come up with catchy melodic hooks all the time,  so you might be wondering why would it be easier to compose harmony first?  The reason is that it is fairly easy to adapt melody to a given harmony.  It is fairly challenging to add a harmony to an existing melody.

Again, you might be thinking, why should it be difficult to add a harmony to a melody? Because depending on your melody, their might be no harmony that matches it. Case in point: consider the simplest melody you could write that goes “C D”. Guess what? There is no major or minor chord that contains both C and D. That means that you would have to dive into much greater depth and analyze how to resolve note conflicts. Should I match the C and ignore the D? Should I match the D and ignore the C? Should I use a more complex 7th chord that contains both? Answering these questions requires understanding on a much deeper level how chords and notes interact.

When writing harmony first, these questions are a lot easier to answer.

Stay tuned in for more articles about The Craft of Composing, but in the meantime check out other great resources on the site.

Introduction

The art of composing music has long been regarded as a lofty goal that is unattainable by most mere mortals. Only those who were born with superior natural talent were allowed to attempt it, while the rest of us were left to watch from the sidelines. I remember when I dared to enroll in my first composition class. I thought for sure the other members of the class would be so much more advanced than me that I would give up composing after one semester.  Now, decades later I am still composing.

What I am hoping to give you here is something that I never had – clear roadmap. Even after I had a graduate level degree in composing from a top university and even after I had written and conducted for symphony orchestra, I still found myself struggling in some very basic situations. Can I really write this note against this chord? Will this harmony work? With so much knowledge sometimes it seemed like the simplest problems were the hardest. It was only after years of writing professionally that I finally started to codify my ideas into something usable and teachable.

In most composition classes, at least the ones I experienced, there is little or no guidance. The teacher basically asks everyone to go and write something, then at the next class there is a roundtable discussion about whether the piece worked or not. Basically we were supposed to go get lost in the woods and then somehow find our way back. The problem with this approach is that the reason you sign up for a composition class in the first place is because you are already lost.

This material is designed to provide you with the tools necessary to compose music. These tools will hopefully allow you to turn your creative ideas into a finished product. The methods presented here are very useful and can cover hundreds of different situations. They have been tested under the harshest conditions possible and have delivered many a finished product on time. I hope you will enjoy learning them as much as I have.

We are mainly interested in techniques, that is, specific step by step methods used to get a particular job done. Realize that technique is not a dirty word. It is not the opposite of creativity. It goes hand in hand with the creative process to turn ideas into concrete things. Mastering the techniques given here will not limit you, but instead will free you and inspire you with new ideas.

This material is highly condensed. Each chapter is worthy of at least a month or a year of study. For that reason, take the time to really investigate the meaning of what is being presented. Experiment with the ideas. Try them out in different contexts. Develop them further and add your own creative spark. After you’ve done this, revisit them in the future.

Realize also that you do not have to be a musical expert in order to use this material. The first few chapters are designed to help you build a solid foundation so that even if you are a beginner, you can be writing beautiful melodies within a few weeks.

Cycling Rhythms

Typically, a piece of music is organized into measures, the length of which is determined by the meter. While a certain meter may specify that the music should be in a time signature such as 4/4, in reality this is just a suggestion. That is, the composer may choose rhythms which go against the meter of the piece. When you use a rhythmic grouping that contrasts with the chosen meter, this is called cycling.

In the following example, you will see a rhythmic pattern that repeats every 3 beats, even though the time signature is 4/4.


Here is another example where there is a rhythmic pattern based on three beats existing in measures that contain 4 beats:

* Now complete the exercises entitled Cycling 1 and Cycling 2.

This technique can also work with faster rhythm such as 8ths, 16ths, or even 32nd notes. Typically, it is most effective when there is a note (not a rest) at the start of the pattern so the ear has a way to orient itself.

If there is no rest, it can also work if there is an accent to denote the different segments in the pattern. Here is a 3 3 2 cycling rhythm using 8th notes with accents:

Because cycling causes the rhythm to become out of sync, it is necessary after a while to have some makeup notes that fill up the remaining beats in the measure and get it back on the downbeat. For example, in the pattern above the cycling pattern is based on groups of three. After playing twice, we see two notes to finish up the bar. This gives a total note count of eight, enough to fill up the measure. Thus, if the pattern continues again in the next measure, it will again be aligned with the downbeat:

A contour with the appropriate number of notes can also create a cycling pattern. This is common on new age and popular music:
When the time signature is 4/4, 3/4, or any time signature where the beat length is  a quarter note, the typical formula for creating a cycling pattern is this:

  1. Choose a speed, either quarters, eighths, or sixteenths.
  2. Choose a rhythmic pattern with a total length of three units.
  3. Repeat the rhythm at the given speed until you are nearing a barline, usually two or four times.
  4. Add the appropriate number of makeup notes to finish the bar.

There are many different types of cycling patterns. Given 4/4 or some other even time signature, here are some of the common groupings:

3 3 2

3 3 3 3 4

6 6 4

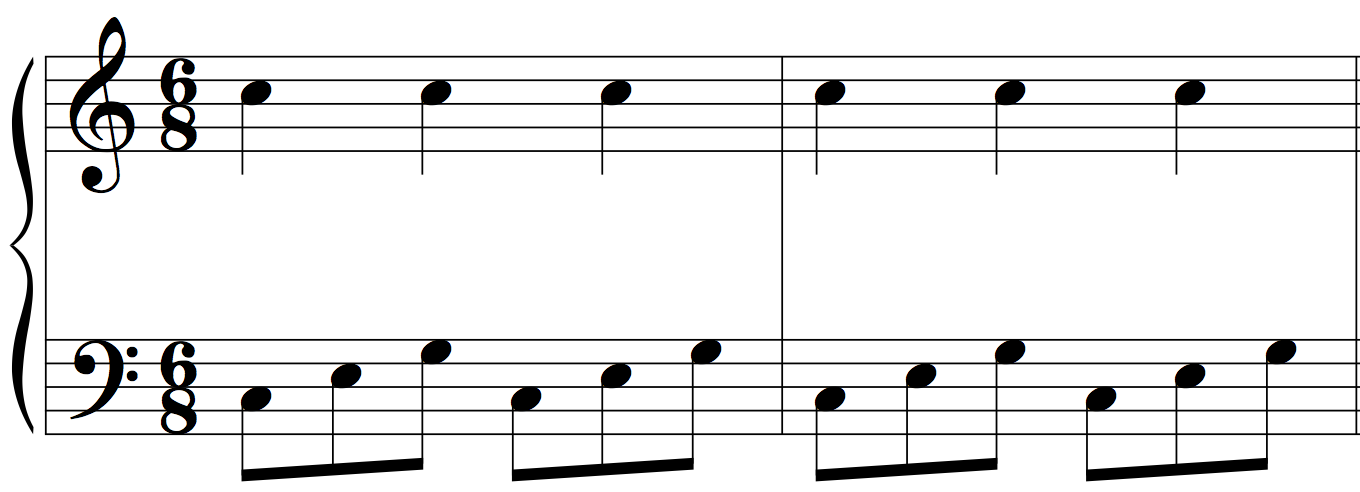
In meters where the beat length is a dotted quarter, such as 6/8, 9/8 or 12/8, the formula is only slightly different. The rhythmic motive should be one, two or four units long (namely powers of two). In the example below the meter is 6/8, meaning each beat contains three 8th notes. The cycling pattern uses quarter notes, which are equivalent to two eighth notes.

In 3/4, like 4/4, the cycling pattern is based on groups of three. Here we have a 3/4 meter with a cycling melody using dotted quarters, which are equivalent to three eighth notes:

  • Please complete the exercises entitled Cycling 3 and Cycling 4.

Scales

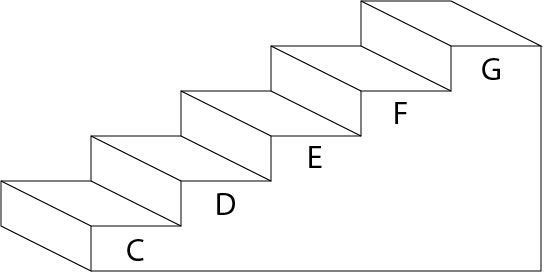
An understanding of music theory, and of composition, starts with an understanding of scales. A scale is a series of closely spaced notes in order from low to high, or high to low. Scale means “staircase”.

In Western music, the most common scale is the C Major Scale. The major scale is also called the Diatonic (seven note) scale. The major scale can be thought of as the ruler by which everything else is measured. By understanding the structure of the major scale, we can easily understand how all other scales and chords are named.

When we move from one note to the next in a scale, it is called a step. As we mentioned before, the major scale can be thought of as a ruler. Unlike an ordinary ruler, however, the elements of a major scale are not evenly spaced. There are two sizes of steps called a half step and a whole step. A half step is the smallest unit in our musical system. It is the distance from one note to the nearest neighboring note. On the piano it is usually the distance from a white key to the nearest adjacent black key. On the guitar, it is the distance from one fret to the neighboring fret. A whole step, on the other hand, is twice as large and is equal to two half steps.

The C major scale is created by starting on C and following the pattern whole whole half, whole whole whole half. Notice that most of the notes are separated by a whole step, except between E/F, and B/C where you find half steps.

This pattern is so fundamental to Western music that it is literally built in to the structure of the piano and many other instruments. If at any time you forget the pattern of half steps and whole steps, simply look at the piano keyboard. The places where you don’t see a black key are where the half steps are located.

What gives any group of notes its particular sound, as well as its name, is not the notes themselves, but how those notes are spaced. Similarly what makes a major scale major is not the notes it contains, but the spacing of those notes. As long as the notes follow the pattern whole whole half, whole whole whole half, the notes will form a major scale. If we replace the letters with numbers in the picture above we get a more general representation of a major scale:

Now we can see that the half steps are between 3/4 and 7/8. Each number is called a scale degree. This simply indicates what number note it is in the scale. The distance between any two scale degrees is called an interval. If the major scale can be thought of as a musical ruler, then intervals can be thought of as musical inches. The term interval will be used again and again throughout this book.

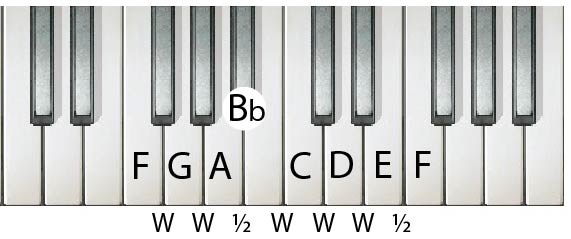
There are twelve uniquely different notes in our musical system. As mentioned before, it is the spacing between notes that is important. In the first scale, we used C as our starting point. If we start on a different note but use the same spacing, we will get a different scale. For example, to create an F major scale, we start on the note F and go whole whole half, whole whole whole half:

Look at the interval from A to Bb. We know that in order to keep the pattern of whole whole half, whole whole whole half we require a half step here. However, in its natural state the interval from A to B is a whole step. By choosing Bb instead of B, we force the interval to become a Half Step.

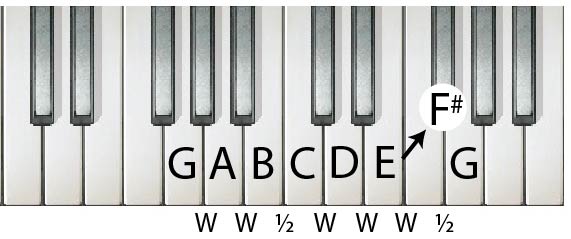
Now let’s look at another example. We will form a major scale by starting on G and following the pattern of whole whole half, whole whole whole half.

G major scale shown on piano keyboard

Look at the interval from E to F#. We know that in order to keep the pattern of whole, whole, half, whole, whole, whole, half we require a whole step here. However, normally the interval from E to F is only a half step. Therefore we replace F with F#, forcing the interval to become a whole step.

In the workbook, please fill out the worksheet entitled Notes in Every Key.

Minor 9ths

There is only one sound which is universally frowned upon regardless of musical genre, and that sound is the Minor 9th. Whether you are listening to Jazz, Classical, or Popular music, this interval produces a harsh sound that rarely works in any context. While it can sometimes work if prepared carefully, the key word is caution. The more skillful you are at recognizing this interval, the better your chances of not falling victim to it.

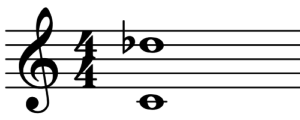
A Minor 9th is equivalent to a Minor 2nd plus an Octave.

In a complex score with many parts, it can be very challenging to identify where minor 9ths occur. Here is a simple rule of thumb that may be used.

  1. Know if your chord contains any half steps, and where they occur. Major and Minor triads don’t contain half steps. However, larger chords such as Major 7th chords do. For example, in a C Major 7 chord, the half step is between B and C.
  2. Identify places where the lower note of a half step is being played in a lower voice and the upper note of the half step is being played in an upper voice. In a C Major 7 chord this would mean B in a lower voice, and C in an upper voice.
  3. If there is at least an octave distance between them, you have a Minor 9th.

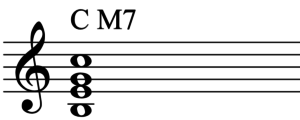
Here is one of the most common (and offensive) examples of a Minor 9th. The chord is C Major 7 which contains the notes C E G B. It is inverted so that B is in the bottom voice and C is in the top voice. Together these form a Minor 9th.

Supposing you have identified that a Minor 9th is occurring, how do you correct the problem without totally rewriting the measure? That is simple: swap the position of the two notes.

Minor 9ths can occur normally as non-harmonic tones. They pose no special threat if approached and left carefully. The same rules apply as with other non-harmonic tones. It is still useful to be aware of their sound. When used correctly, their characteristic tone will still be present, but weak enough that it is not harmful.

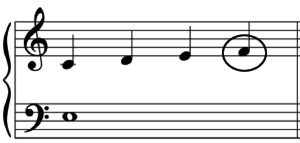
This example is relatively harmless because the minor 9th is approached by step, meaning its sound will not be too strong.

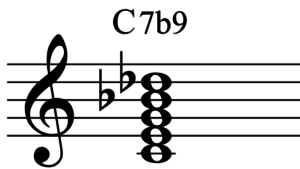
The only commonly used chord containing a Minor 9th is the Dominant 7b9 chord. This can be seen in both jazz and classical idioms going back to J.S. Bach.

It may also be used in horror film music to evoke fear and tension. The lesson here is that when a harsh sound is desired, this interval can be useful.

Even when used to create tension, however, some care must be taken. Because the Minor 9th is the most dissonant of all intervals, it is also the least resonant. That means that when used in an orchestral setting, the result can sound dull, even weak. There is no reinforcement between the partials of the various notes. Therefore if a loud, bombastic sound is desired, again the Minor 9th may not be the ideal choice.

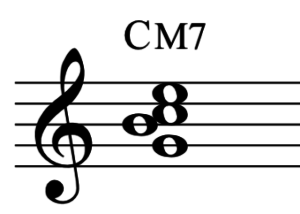
Strangely, its lesser sibling the Minor 2nd interval is more agreeable. For example, this voicing of a C Major 7 chord contains a Minor 2nd interval, and sounds very pleasant:

In short, Minor 9ths must be used with caution. The only commonly used chord which employs this interval effectively is the Dominant 7b9. As non-harmonic tones, they can be used as long as the normal considerations regarding approach and departure are followed. In an orchestral setting related intervals such as the Minor 2nd or Major 7th might be more favorable.